Renting an off-road vehicle can be fun, but it requires preparation to avoid surprises. Here’s what you need to know:
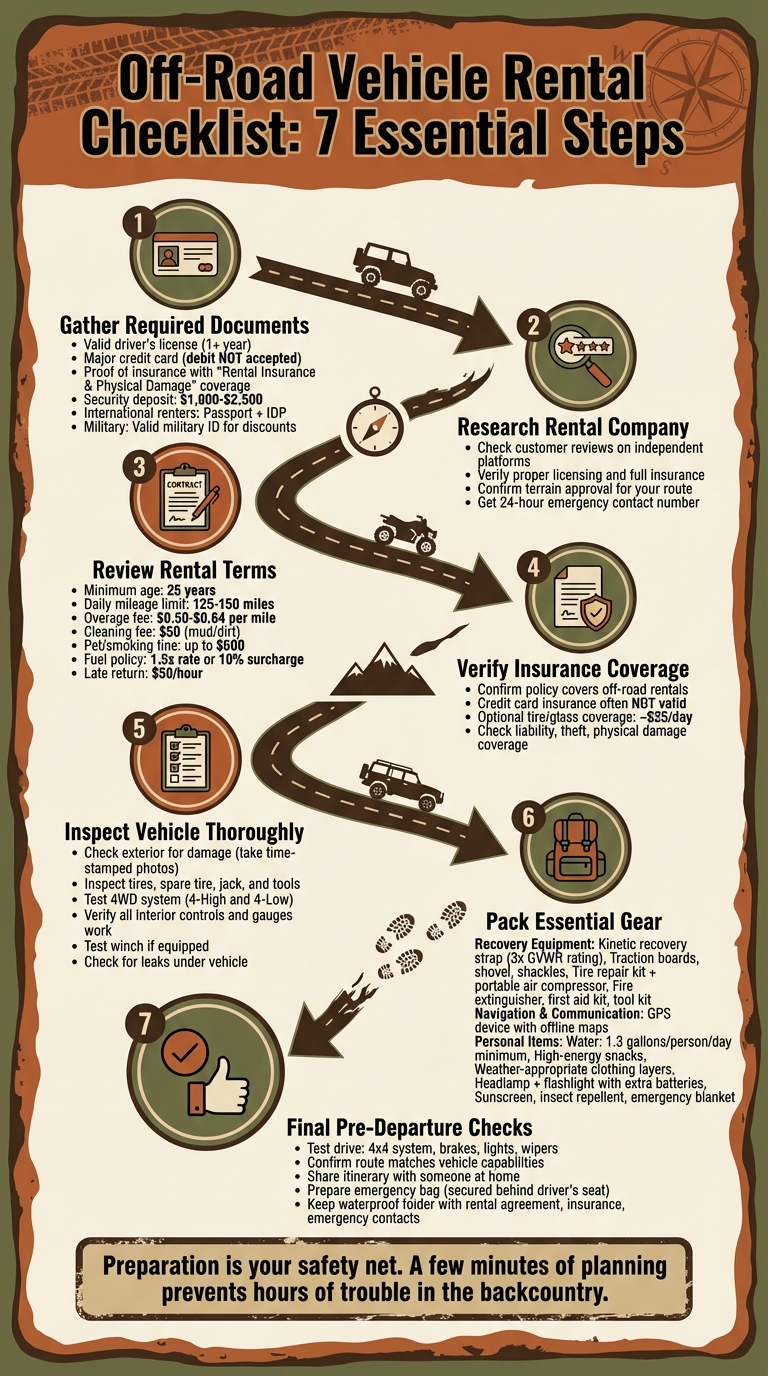
- Documents: Bring a valid driver’s license, a major credit card (not debit), and proof of insurance. International renters need a passport and IDP.
- Rental Companies: Research reviews, confirm insurance, and check terrain restrictions.
- Rental Terms: Understand age limits (usually 25+), mileage caps, cleaning fees, and prohibited areas.
- Insurance: Verify your policy covers off-road rentals. Credit card insurance often doesn’t apply.
- Inspection: Check for damage, test 4WD systems, and document everything with photos.
- Gear: Pack essentials like recovery tools, navigation devices, water (1.3 gallons/day per person), and a first aid kit.
- Final Steps: Test drive the vehicle, confirm your route, and share your itinerary with someone.
Preparation is key to a smooth, safe off-road trip. Always double-check policies, gear, and the vehicle before heading out.
Complete Off-Road Vehicle Rental Checklist: 7 Essential Steps
Before You Rent: Preparation Steps
Gather Required Documents
Before renting, make sure you have all the necessary paperwork. You’ll need a valid, non-restricted driver’s license that you’ve held for at least one year, along with a major credit card in the primary driver’s name. Keep in mind, debit cards are not accepted for security deposits, which typically range from $1,000 to $2,500.
Another must-have is proof of insurance. Check with your insurance provider to ensure your policy includes "Rental Insurance & Physical Damage" coverage for off-road vehicles. Don’t assume your credit card insurance will cover you – companies like UT Overland explicitly state that credit card insurance is not valid for off-road vehicle rentals.
If you’re in the military, bring your valid military I.D. or CAC card to access potential discounts. International renters should have both a passport and an International Driving Permit (IDP).
Once your documents are in order, take the time to evaluate the rental company’s reputation.
Check the Rental Company’s Background
Not all off-road rental companies are created equal, so doing a little homework can save you a lot of trouble. Look up customer reviews on independent platforms to get a sense of their safety record and maintenance standards. Reviews often highlight key details, like the condition of the vehicles and how the company handles issues like breakdowns or damage disputes.
"Not all ATV rental services are created equal. Look for a reputable provider with positive reviews, clear policies, and a focus on safety." – Xplor ATV Tours
Make sure the company is properly licensed and carries full insurance coverage. Additionally, confirm that the vehicles are approved for the terrain you plan to explore. Some companies may rent off-road vehicles but restrict their use on rugged trails. It’s also a good idea to ask about their 24-hour emergency contact number and what assistance they provide if you run into trouble in remote areas.
Once you’ve vetted the company, take a close look at their rental terms to avoid surprises.
Review Rental Terms and Policies
Carefully read the rental agreement to understand all conditions and fees. Many companies have strict requirements, such as a minimum driver age of 25 years and daily mileage limits of 125–150 miles. Exceeding these limits can cost you anywhere from $0.50 to $0.64 per mile. Pay special attention to prohibited areas – some high-risk trails, like Elwood Pass or Black Bear Pass, are off-limits, and driving there could void your insurance coverage.
Cleaning policies are another area to note. If you return the vehicle with mud or dirt inside, expect a $50 cleaning fee. Smoking or bringing pets into the vehicle can result in fines of up to $500. Fuel policies usually require returning the vehicle with a full tank; if not, you’ll face fuel charges at 1.5 times the standard rate or a 10% surcharge. Late returns typically incur a $50-per-hour fee. Additionally, you’re fully responsible for any damage to rental gear like rooftop tents, coolers, or recovery equipment.
"Any damage caused to vehicle or rental gear will be the renter’s sole responsibility to repair or replace." – Colorado Overland Adventures
Lastly, make sure all drivers are listed on the rental agreement. If someone not listed drives the vehicle, it voids all insurance coverage, leaving you personally liable for any damage. Understanding these terms upfront will help you avoid unexpected charges and ensure a smooth rental experience.
sbb-itb-161ccc1
Do You Know These Top 7 UTV Rental Tips?!
Insurance and Safety Requirements
Once you’ve sorted out your documents and rental terms, it’s time to dive into the details of insurance and safety requirements. These are crucial for a smooth and worry-free off-road adventure.
Verify Insurance Coverage
Before picking up your rental, double-check your insurance coverage. Most off-road rental companies require proof of your own comprehensive and collision insurance, as rental rates typically don’t include coverage.
Reach out to your insurance provider to confirm whether your policy covers off-road rentals, including liability, theft, and physical damage. Keep in mind that standard car insurance policies and credit card waivers rarely extend to off-road vehicles, especially on rugged trails.
"You MUST verify with your insurance provider that your policy covers Rental Insurance & Physical Damage. No exceptions!" – Colorado Overland Adventures
If your policy doesn’t cover off-road rentals, you’ll be fully responsible for any damage. This includes not just repair costs but also "loss of use" fees – compensation for the rental company’s lost income while the vehicle is being repaired – and diminished value charges if the damage lowers the vehicle’s resale value. Credit card coverage is often excluded for off-road rentals, as many cards explicitly omit off-road use from their Collision Damage Waivers.
Some rental companies offer optional add-on coverage for common trail mishaps, like tire and glass damage, which can cost around $25 per day. Once you’ve confirmed your coverage, make sure all drivers meet the age and experience requirements for the vehicle.
Confirm Age and Experience Requirements
Most off-road rental companies set a minimum age of 25 for drivers, though some UTV rentals may allow drivers as young as 18. Additionally, a minimum height of 60 inches is often required to ensure proper control of the vehicle. These requirements aren’t just about following policy – they’re essential for safe vehicle operation.
Rental agreements also include restrictions for safety reasons. Drivers who are pregnant, have medical conditions affecting their ability to drive, or are under the influence of alcohol or drugs are typically prohibited from operating the vehicle. Make sure all potential drivers are listed on the rental agreement. Allowing unlisted drivers to operate the vehicle could void your insurance coverage and leave you personally responsible for damages.
Get Necessary Permits
Specific permits may be required to access certain trails or off-road areas. National parks, sand dunes like Monahans Sandhills, and private ranches often have their own permit systems and regulations. Skipping these permits can lead to fines and might even void your rental agreement, which could create unnecessary complications.
Research your planned route thoroughly to identify any permit requirements. Some rental companies may offer guidance on navigating these regulations, so it’s worth checking with them during the booking process.
Vehicle Inspection Checklist
Before hitting the trails, take the time to inspect your off-road vehicle carefully. Document any damage with time-stamped photos or videos for your records.
Check Exterior and Tires
Start with the vehicle’s body and frame. Look for cracks, rust, or debris like sticks and mud that might be stuck in the frame. If the vehicle appears to be leaning or sagging, it could signal suspension problems. Use a flashlight to check the undercarriage for any puddles or drips – oil, coolant, or grease leaks can indicate trouble.
"Leaks are an early sign that you have a potential problem. It might just be a seal that needs replacing, but often it can be an underlying mechanical issue."
– Wesley Ellard, Expert at Clutch and Powertrain
Next, inspect the tires. Look for chips, tears, bubbles, or worn tread. Confirm that all lug nuts are present and tightened. Don’t overlook the spare tire – ensure it’s full-sized, properly inflated, and that the jack and tools are included. If the vehicle has roof racks or recovery points, check that they are securely mounted.
Test Interior Controls and Systems
Move inside and test all controls, gauges, and safety features. This includes the wipers, lights, horn, air conditioning, seatbelts, and dashboard indicators. Make sure no warning lights remain on. Check the exterior lights – headlights, high beams, turn signals, and hazards – and confirm the heating, air conditioning, and defrosters are working, especially if you’ll be driving in extreme conditions.
Locate the owner’s manual and insurance documents in the glove box. If the vehicle comes with communication devices, like a satellite phone or UHF radio, verify they’re fully charged and operational.
Test Off-Road Features
If the vehicle has 4WD, test it by switching between 4-High and 4-Low. Listen for any unusual noises and ensure it engages properly on low-traction surfaces. Look for visual confirmation, such as a "4WD engaged" message on the instrument cluster. A brief drive on gravel or grass can confirm the system is functioning as it should.
For vehicles equipped with a winch, wear leather gloves and free-spool the rope completely to check for frays or damage. Test its pulling capability to ensure it’s working. Inspect the shocks and springs to confirm they’re seated correctly and check for leaks. Examine the driveshafts and U-joints for slack or oily residue near the transfer case and axles.
"By setting a baseline of what is normal with regular inspections, you can greatly increase the chances of catching a small problem before it becomes a major one."
– Chris Cordes, Senior Editor, Expedition Portal
Thoroughly testing these off-road systems ensures your vehicle is ready to handle whatever terrain lies ahead.
What to Pack for Your Trip
When heading into remote terrain, the gear you pack can make all the difference. Being prepared can turn a potential disaster into a manageable situation.
"Nature doesn’t care if you’re ready. Mud, sand, or snow will trap your rig when you least expect it." – Aaron Redstone, Founder of Off-Road Pull
Safety and Recovery Equipment
Start with the essentials for vehicle recovery and safety. A kinetic recovery strap rated at three times your vehicle’s GVWR is a must. These straps stretch to absorb shock, unlike static tow ropes, which should only be used for towing on solid ground. Add traction boards, a shovel, and shackles (either forged steel D-rings or synthetic soft shackles) to your kit.
If your vehicle is equipped with a winch, confirm it’s rated to pull at least 1.5 times the vehicle’s GVWR. Additionally, pack a tire repair kit with plugs and patches, a portable air compressor for re-inflating tires after deflation, and a fire extinguisher designed for vehicle use. Don’t overlook a first aid kit, jumper cables or a jump starter, and a basic tool kit with essentials like wrenches, sockets, and pliers.
Navigation and Communication Tools
Cell service is often unreliable on remote trails, so having redundant navigation and communication tools is critical. Before heading out, preload topographic maps onto a GPS device like the Garmin Tread or offline apps such as OnX Offroad or Gaia GPS. A satellite communicator (e.g., Garmin inReach or SPOT X) is invaluable for two-way messaging and SOS capabilities when you’re beyond cell coverage.
For analog backups, pack paper maps and a compass. Ensure your devices stay powered with a portable power bank or power station, and consider foldable solar panels for longer trips. In group settings, two-way radios (GMRS or CB) allow real-time communication between vehicles. Always share your route and check-in times with someone at home, along with a tracking link from your satellite device.
While digital tools are convenient, having reliable backups and a clear communication plan ensures you’re prepared for unexpected situations.
Personal Protection and Comfort Items
Once your vehicle and recovery gear are ready, focus on packing for personal safety and comfort. Weather in remote areas can be unpredictable, so bring moisture-wicking base layers, insulated mid-layers, and waterproof outer shells to handle sudden temperature changes. Even in summer, high-altitude or desert nights can be cold – pack thermals and a warm jacket just in case. For footwear, choose sturdy hiking boots and pair them with wool or synthetic socks to avoid moisture buildup and blisters.
To protect against sun and insects, pack high-SPF sunscreen, polarized sunglasses, a wide-brimmed hat, and insect repellent. Hydration is critical – carry at least 5 liters (about 1.3 gallons) of water per person per day, especially in arid regions. Add high-energy snacks like protein bars, jerky, and trail mix to keep your energy up. Other essentials include a high-output flashlight, a headlamp with extra batteries, and an emergency blanket that reflects 90% of your body heat. Pack at least two full changes of clothes, with extra socks, and secure all gear with heavy-duty straps to prevent loose items from becoming hazards on rough terrain.
Final Checks Before Departure
You’ve packed your gear and inspected the vehicle, but a few last-minute steps can save you from unexpected problems on the trail. These checks take just a few minutes and can make all the difference between a smooth trip and a frustrating one.
Take a Test Drive
Before you hit the road, test the 4×4 system. As Summit 4X4 points out, "Nobody realizes that their 4×4 doesn’t work until they are fully stuck and realize that the front tires are not spinning at all". Shift between 2WD, 4-wheel high (4H), and 4-wheel low (4L) to ensure the transfer case engages smoothly without any grinding noises. If the vehicle has differential lockers, activate them to confirm proper function – look for dashboard indicators and notice any changes in steering resistance.
While driving, pay close attention to the brakes. The pedal should feel firm, not spongy, and the vehicle shouldn’t pull to one side or make squealing noises. If the tire pressure light comes on – a common issue in rentals – double-check whether it’s a sensor error or an actual problem before heading out. Listen to the engine while idling to familiarize yourself with its normal sound. As Last Great Road Trip suggests, "You should know your rig’s personality including how its engine sounds normally". Also, test the windshield wipers, headlights (both high and low beams), and the parking brake. Input a destination into the GPS to ensure it works and that you understand how to use it. If anything feels off, report it to the rental company right away to avoid being blamed for pre-existing issues.
Once you’ve confirmed the vehicle is ready, you can plan your trip with confidence.
Confirm Your Route
After ensuring the vehicle is in good shape, double-check that your chosen route matches both the vehicle’s capabilities and your own experience level. Confirm with the rental company that the vehicle is equipped for your planned terrain, including features like four-wheel drive, low-range gearing, and adequate ground clearance. Stick to designated off-road parks and trails, which are designed for varying levels of difficulty and are regularly maintained. To get a better sense of the terrain, study maps, consult experienced drivers, or even watch virtual trail tours.
Share your complete itinerary with someone back home. Include your route, estimated check-in times, and the rental company’s emergency contact number. If you’re traveling alone, consider carrying a satellite communicator for added safety. Also, check ahead to see if your route requires any special trail passes or permits.
Prepare an Emergency Bag
One last step: pack an emergency bag for unexpected situations. Secure it behind the driver’s seat with heavy-duty straps instead of bungee cords – loose items can become dangerous on bumpy trails.
Your bag should include essentials like water (at least 1.3 gallons per person), high-energy snacks like protein bars or jerky, a power bank with charging cables, and a headlamp with spare batteries. A well-stocked first aid kit is also crucial. It should have bandages, gauze pads, antiseptic wipes, medical gloves, and trauma pads. Add a multi-tool with pliers, a knife, and a screwdriver, as well as an emergency escape tool with a seatbelt cutter and window breaker. Other useful items include LED road flares or warning triangles, a Mylar emergency blanket for warmth, sunscreen, bug spray, and wet wipes.
Finally, keep a waterproof folder with physical copies of your rental agreement, insurance details, and emergency contact numbers. Phones can die, but having backup documents ensures you’re prepared. As the National Highway Traffic Safety Administration wisely reminds us, "Even a well-maintained vehicle can break down". A little preparation goes a long way in keeping you safe and ready for anything.
Conclusion
Renting an off-road vehicle can be a smooth and enjoyable process when you approach it with the right mindset and preparation. As Ethan Vaade from Dairyland® wisely notes, "Taking a few minutes to prep before each ride can help you avoid problems when you’re deep in the backcountry". Those few minutes spent inspecting, testing, and documenting the vehicle can save you from costly repairs or dangerous situations far from help. Treating preparation as an integral part of the adventure ensures a safer and more memorable trip.
The best off-road journeys have one thing in common: careful planning and preparation. This includes thorough documentation, verified insurance coverage, and essential recovery gear. Breakdowns in remote areas are one of the biggest challenges you might face, so packing essentials like snatch straps, a shovel, and at least 1.3 gallons of water per person is non-negotiable – it’s your safety net. Routine checks and inspections are your first line of defense against unexpected issues.
"By setting a baseline of what is normal with regular inspections, you can greatly increase the chances of catching a small problem before it becomes a major one."
– Chris Cordes, Senior Editor, Expedition Portal
This advice applies whether you’re driving your own rig or a rental. Always do a final walk-around, take time-stamped photos of the vehicle, and test all critical systems – from 4×4 engagement to windshield wipers – before hitting the trail.
Off-roading is all about preparation meeting adventure. When your route aligns with the vehicle’s capabilities, your emergency bag is packed with essentials like a headlamp, multi-tool, and first aid kit, and someone back home knows your itinerary, you’re ready to tackle the trails with confidence. Adventure safely and enjoy the ride.
FAQs
What should I do if my insurance won’t cover off-road rentals?
If your current insurance policy doesn’t extend to off-road rentals, it might be a good idea to look into specialized off-road rental insurance. These policies are designed to cover damages, liability, and the specific risks that come with off-road driving.
Another option is to see if the rental company provides coverage, such as damage protection plans or excess reduction options. Adding this extra coverage can give you peace of mind and protect you from surprise expenses during your off-road trip.
How can I prove pre-existing damage so I’m not charged later?
Before hitting the road in a rental car, make sure to document its condition thoroughly to avoid being held responsible for damage that was already there. Snap clear photos and videos of every side of the vehicle, paying close attention to even the smallest scratches or dents. Take your time inspecting the car and ensure that any existing damage is clearly noted in the rental agreement. This step creates a solid record of the car’s condition, helping you steer clear of any unfair charges later.
What gear is essential if I lose cell service or get stuck?
If you find yourself without cell service or stuck during an off-road trip, having the right gear can make all the difference for your safety. Essentials include a first-aid kit for treating injuries, dependable lighting like a headlamp or work light to navigate in the dark, and fire-starting tools such as waterproof matches, lighters, or fire starters. Don’t forget to pack extra clothing or emergency blankets to stay warm while waiting for help. These basics can keep you prepared for unexpected situations.